Vue3 + Springboot3 前后端分离转合并
Vue3 + Springboot3 前后端分离转合并
一、为什么要转合并?
无非以下几点:
- 项目不是很大,前后端各自开发完毕后整合到一块部署,方便运维
- 开源小项目,多端多仓库不利于用户使用,影响项目热度
- docker部署,对于小型企业和个人,更希望部署在一个容器内方便管理(适配其他管理面板,如 1panel 等)
二、操作流程
前端打包
使用项目的包管理器,下面以 pnpm 为例1
pnpm build
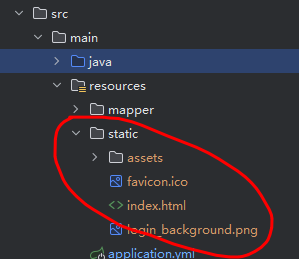
找到打包好的文件
移入后端并修改文件夹名称
添加模板引擎依赖
不使用模板引擎,但需要其视图解析功能1
2
3
4
5<!-- thymeleaf 模板引擎 -->
<dependency>
<groupId>org.springframework.boot</groupId>
<artifactId>spring-boot-starter-thymeleaf</artifactId>
</dependency>在对应 Config 类中添加代码
1
2
3
4
5
6
7
8
9
10
11
12
13
14
15
16
17
18
19
20
21
22
23
24
25
26
27
28
29
30
31
32
33
34
35
36
37
38
39
40
41
42
43
44
45
46
public class WebMvcConfig extends WebMvcConfigurationSupport {
/**
* 显式配置视图解析器
*/
public ViewResolver viewResolver() {
var resolver = new InternalResourceViewResolver();
resolver.setPrefix("classpath:/static/");
resolver.setSuffix(".html");
return resolver;
}
/**
* 处理静态资源
*/
public void addResourceHandlers(ResourceHandlerRegistry registry) {
log.info("处理静态资源");
registry.addResourceHandler("/static/**")
.addResourceLocations("classpath:/static/static/");
registry.addResourceHandler("/**")
.addResourceLocations("classpath:/static/")
.resourceChain(true)
.addResolver(new PathResourceResolver() {
protected Resource getResource( String resourcePath, Resource location) throws IOException {
Resource requestedResource = location.createRelative(resourcePath);
return requestedResource.exists() && requestedResource.isReadable() ? requestedResource
: new ClassPathResource("/static/index.html");
}
});
}
/**
* 映射前端路由
*/
public void addViewControllers(ViewControllerRegistry registry) {
log.info("映射前端路由");
registry.addViewController("/").setViewName("forward:/index.html");
registry.addViewController("/{x:[\\w\\-]+}").setViewName("forward:/index.html");
}
}修改项目配置(application.yml 或 properties)
1
2
3
4
5
6
7
8
9
10
11
12
13
14
15
16
17
# spring 配置
spring:
# 前端模板相关
thymeleaf:
cache: false
enabled: false
check-template-location: false
web:
# 静态资源相关
resources:
cache:
period: 3600
chain:
strategy:
content:
enabled: true
paths: /**访问 localhost:8080 检查配置情况,至此简单的合并完成
三、后端配置安全框架的解决方案(sa-token 为例)
将所有的 rest API 全添加一个前缀,例如
/api1
2
3
4
public class UserController {修改拦截器配置,拦截
/api,放行登录接口1
2
3
4
5
6
7
8
9
10
11
12/**
* 注册 Sa-Token 拦截器
*/
public void addInterceptors(InterceptorRegistry registry) {
log.info("注册 Sa-Token 拦截器");
registry.addInterceptor(new SaInterceptor(handle -> StpUtil.checkLogin()))
// 只拦截 api 接口
.addPathPatterns("/api/**")
// 放行登录接口
.excludePathPatterns("/api/login");
}
按照上述配置,即可实现合并的同时,不耽误前后端分离开发。
本博客所有文章除特别声明外,均采用 CC BY-NC-SA 4.0 许可协议。转载请注明来源 Amane64!
相关推荐


评论